


Have you ever thought that your website is too slow and that you are not getting enough visitors as a result of poor performance?
47% of visitors want to be able to access a website in under 2 seconds, and 40% will leave if it takes any longer than 3 seconds to load. This can affect the number of potential customers that view your services, products or calls-to-action which can then lead to a lower sales conversion and revenue potential.
To put it in perspective, if an e-commerce website makes $50,000 per day, a one- second delay in website load time could potentially cost the company over 1 million dollars per year.
This means that speeding up your website is essential not only for google ranking but for maximising potential sales.
Luckily, there is a simple method for improving your website’s performance known as optimisation.
By reducing the size of your images and coding, there is less information to be downloaded, thereby reducing your website’s load time.
There are many different optimisation techniques, but this article will focus on 4 key steps that can immediately help you increase your visitors and boost your revenue. Let’s get started.
How to optimise your website
The main idea behind improving your website’s speed is to make your site smaller in terms of bytes. To put it simply, the fewer the bytes required to be downloaded, the faster the page will load. By following these 4 Steps, you can start optimising today and see a visible improvement in your website’s performance:
- Compress your images for web
- Use suitable image types
- Use smaller images on other devices
- Shorten your code
Let’s have a look at these optimisation methods in more detail.
Step 1: Compress your images for web
Being the standard file type for visual information, images are the most common forms of content in most websites and as such, they usually occupy the largest size in terms of bytes. Effective image optimisation can significantly reduce your website’s overall size and can therefore lead to vast improvements in website performance.
Image compression is therefore considered the single-most effective content optimisation technique– you are best off putting the most effort here.
We all want our images to be as crisp, detailed and vibrant as possible. Unfortunately, although uploading an extremely high-resolution photo of the night sky with a massive file size could maybe allow visitors to even spot alien life in the tiny pixels, practically, this would not work for a website as it would take forever to load. Image optimisation has to be a compromise between file size and image quality.
Having said that, you would be surprised at how much an image can be compressed before visibly losing any significant detail.
How to compress an image
First, you should make sure to resize your images for their intended use. There is no point in having a 1000px by 1000px image if it is intended use is for a thumbnail image of 300px by 300px. Make sure to export the image to the maximum size that it will ever be viewed – usually the desktop version.
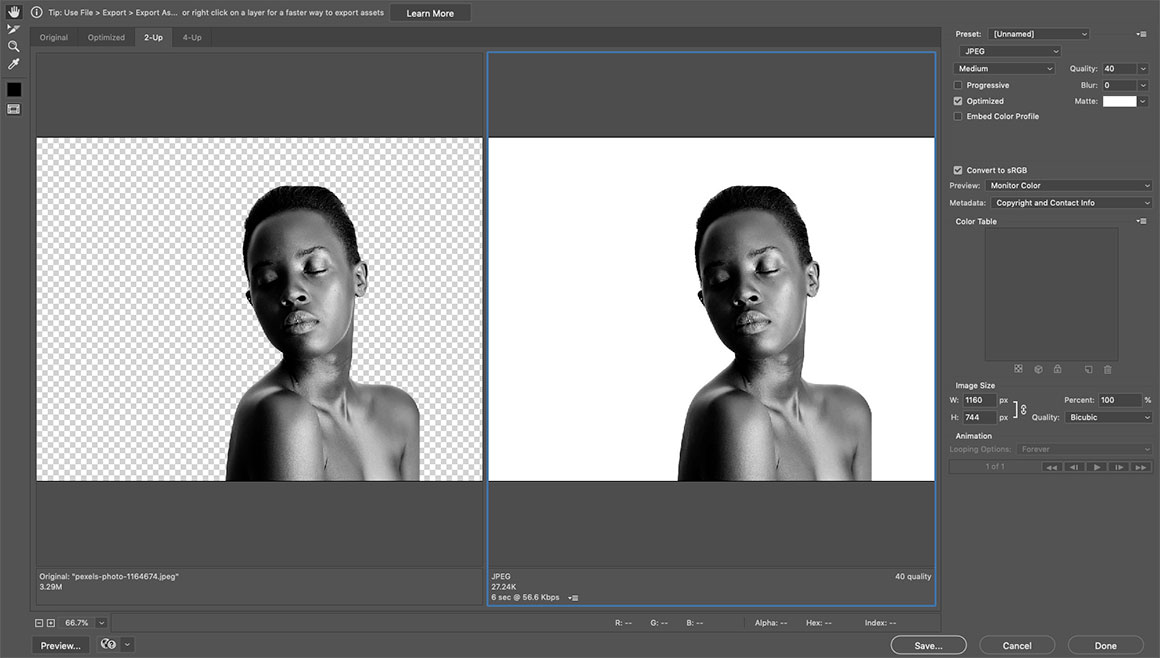
Once your image is in the correct size, you can proceed with compression and exporting. Most image editing software have compression options somewhere in their export settings. In Photoshop and Illustrator, there is an option to “Save for Web” where you can adjust the quality settings to reduce the file size accordingly. Your objective should be to minimise the size as much as possible without seeing a major visible difference in the quality.
TIP: when make compression adjustments, always view your image at actual size rather than zooming in. If you zoom in, you might observe a loss in detail far sooner than what you would at actual size, meaning that you may compress your image less and not make it as small as it could be. This might seem like a minor detail, but when your website contains hundreds of images, this extra size can really add up and affect your site’s performance.
However, not all image types can be compressed. Before proceeding with any compression, you should first decide on what image type you will be using for each image, based in its intended use – which leads us to:
Step 2: Use suitable image types
Once you have finished editing your image, it is time to export your final image to the correct format – the applicable image types for web are JPEG, PNG, SVG and GIF. Let’s have a look at the suitable uses for each image type as well as their compression methods.
JPEG
JPEG is the most common image type as it is most suitable for photographic content such as landscapes, portraits and other photography. It allows for lossy compression of images meaning that they can be compressed and optimised for digital uses such as websites. When exporting an image in JPEG format, you have the option of compressing it with a quality scale from 1 to 100.
TIP: a quality of 40-60 works best on most images as it provides a good balance between size and definition. However, this depends on the complexity and data of each specific photo meaning that some types of images might have to be compressed less to not lose valuable detail.
Below is a comparison between an uncompressed JPEG image with a file size of 450KB and a compressed version of the same image with a quality of 40 resulting to a reduced file size of 50KB. As you can see, the difference in quality is not that noticeable whereas the reduction in file size is significant. Repeating the process for 100 similar images would give your website a total saving of 40MB!


The drawback of JPEG is that it does not allow for transparency. That’s where PNG comes in.
PNG
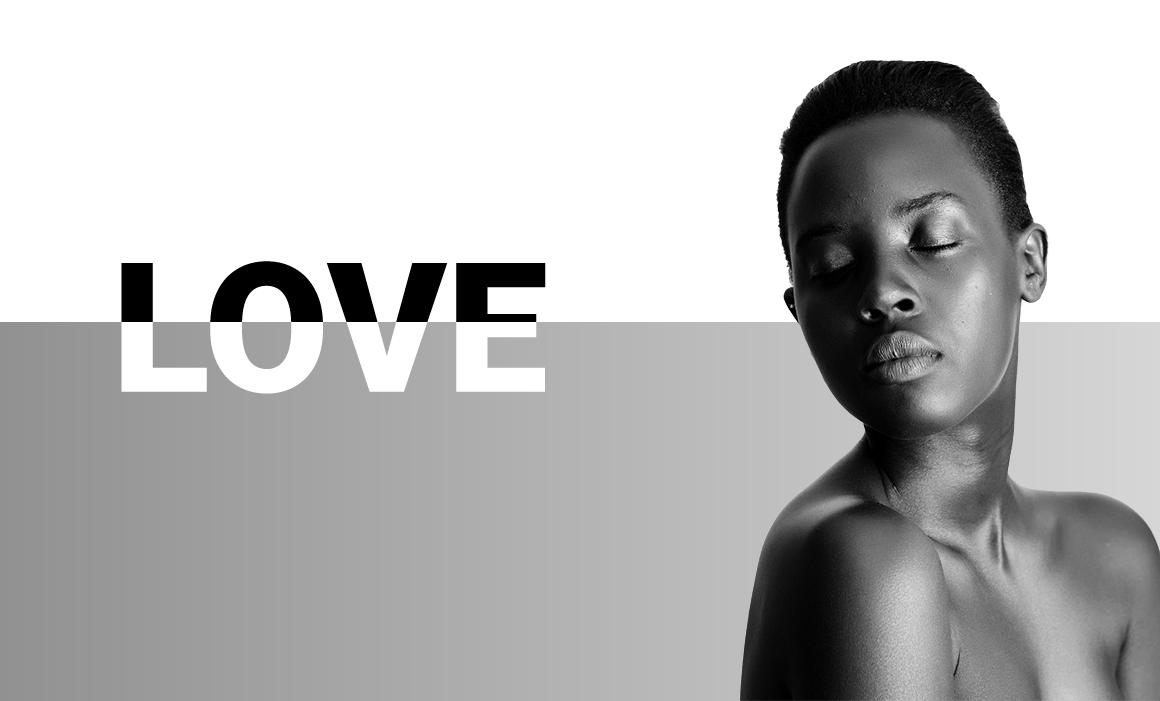
PNG is a lossless image type that allows for the highest quality as well as for transparency. It is commonly used when definition cannot not be compromised such as for high-resolution photography portfolios, or when images require a transparent background like the advertisement below where the model’s head and the “love” typography protrude beyond the grey background.
Despite not having similar compression capabilities as JPEG, PNG can be exported in two different formats, PNG-24 and PNG-8, where the latter utilises fewer colours to generate a smaller file size, ideal for simpler images. Alternatively, you can utilise online tools such as TinyPNG or Kraken to automatically compress your PNGs (and JPGs) to smaller sizes.
TIP: when using TinyPNG to compress images, always double check the final images after compression as they can sometimes be over-compressed or broken due to the tool using an automated process. In such case, you may prefer to use a pre-compressed version instead.
GIF
GIF is another lossless format, similar to PNG, but on top of allowing for transparency, GIFs also allow for animation in the form of short looped videos. They are commonly used for memes and other entertainment media. As GIFs usually contain videos, i.e. multiple images played in sequence, they are quite large in size. However, this can be compensated by reducing the colour count of the GIF image which minimises file size while also giving GIFs their characteristic granular look. This can work quite well with vintage material, such as the GIF below of Audrey Hepburn.

SVG
SVG is a vector image format used for graphics. Vectors are usually very small in size and are completely resizable making them the perfect choice for logos, icons, and other graphic elements.
However, there’s a small caveat. SVGs are ideal for graphics that do not contain a lot of information. A good example of this is a company logo comprised of only a limited amount of basic shapes and colours. With more complicated graphics that use multiple layers, complex paths and many colours or gradients, SVG format is not ideal as it entails a complicated rendering process due to its endless scalability feature and therefore, it can end up being very large in file size. Hence, you might be better off exporting a very detailed and colourful illustration as a JPEG rather than an SVG. Nevertheless, SVG is the image type of choice for the majority of graphic elements. Below are some examples of SVG icons.
Step 3: Use smaller images on other devices
Although resizing and compressing an image for desktop is already a job well done, that image will not necessarily be viewed at the same dimensions on a tablet, note or mobile. You can save additional space by exporting a smaller version of the image for smaller devices and display different variants through the magic of CSS – by creating different classes for each image and changing their display settings on the desired device breakpoints.
TIP: if you use Webflow, it automatically creates smaller variants for each image you upload and displays them as required, at the minimum dimension needed.
You should note that mobiles account for more than 70% of website traffic and often rely on 3G/4G connections for internet access. It is therefore recommended to maximise the optimisation done for smaller screen sizes as they tend to suffer from slower load times.
Step 4: Shorten your code
The final optimisation technique is to shorten the text files of your website’s source code. Since website code can be extremely long and formatted with a lot of spaces and line breaks, you can save quite a lot of space by a process known as minifying which allows you to shorten your CSS and JavaScript codes. You can use online tools such as CSS Minifier and JS Minifier to shorten the respective codes or alternatively, platforms such as Webflow automatically minify your code when you publish your site.
You are now ready to optimise
Now that you know how to compress your images, use suitable image types, apply smaller variants on smaller devices and shorten your code, that wraps up the 4 simple optimization steps for improving website performance. All that is left is for you to apply the techniques you learnt today and start optimising now!


Leave a comment